Hope Jam Update! #
We’re halfway through Hope Jam 1.0, hosted by the lovely LemonPoppyseedGames, and I’ve already done a lot of my goals! I’ve cancelled Obsidian Sync and donated the subscription to The Trevor Project, started re-arranging my office (and the rest of the house oops!), practiced some emotional vulnerability, and wrote some Hope Jam updates. My final activity was to instill some hope and joy through creativity - it’s been a very long time since I was able to do game development, so that’s what this update is about!
Project overview #
My goal for this project was to create an MVP for a new game. I’d like to re-imagine Mouse Maze with new mechanics, features, and more! Mouse Maze was my first published game and since I haven’t made a game in Picotron yet, I felt that this was the perfect project to get more familiar with the fantasy workstation.
Doing the bare minimum #
First things first - I needed to create some basic sprites, put them on a map, and create the logic to handle starting and failing a level. So I made a quick Start and End pad to serve as goals, and just used a maroon square for the path nodes. Then I used Picotron’s sprite flags feature, which allows you to set bits on an unsigned 8-bit int to serve as metadata. I set flag 0b00000001 on all of the “empty” tiles. That way, we can get the mouse position and read the flag on the hovered tile - if the flag == 1, then we know that we should fail the level and reset it.


Using Picotron’s map layers, I was able to draw the start state on layer 1, and the path state on layer 2. Switching between them is as easy as switching which bitmap we draw to the screen!

Autotiling #
It’s not too much fun to look at the void, right? So I hopped into Tilesetter to generate some tiles! After creating a very simple tiling texture in Aseprite, Tilesetter was able to generate all configurations of the tiles for me. Then I added an edge texture and within 5 minutes had a sprite atlas with all of the textures I’d need!

Then it was just a bit of a process to import the texture into Picotron and separate each sprite from the atlas into individual sprites. This didn’t take very long.
Finally, we need to talk about HOW we’re actually going to tile these. I decided to write my own auto-tiling handler, although I’m sure there are better solutions out there. The way I solved it is this:
-- 1 2 3   1. Imagine tile X. Mark each neighbor present with a 1 and each not present with a 0.
-- 4 X 5   2. Store these in a u8 bit-string, with the neighbor index being the indice for the bitstring
-- 6 7 8   3. Create a hashmap table of all possible neighbor configurations to sprite number
Fixing parity errors #
This solution got me 90% of the way there! However, I hadn’t realized that there are multiple potential bit-strings that could map to any sprite number. The game looked like this:

With a bit of tedious work, I slowly worked through as many parity errors as I was able to find and added them to the sprite hash table above. And with that, we have a successful auto-tiling example!

Adding cute palettes #
Now, while I was working through all of these tiling issues, I started getting a lot of eye strain from the beige / maroon palette. I knew I needed to have palettes. Palettes are fun and offer some good customization to players! They also allow users with eye issues to find a palette that makes them the most comfortable. Thankfully, Picotron’s pal() command makes it very easy to swap colors. So, I wrote a quick function that will take the beige and maroon from the spritesheet and select a theme from the list! Here’s some of my favorites:
“Ocean”

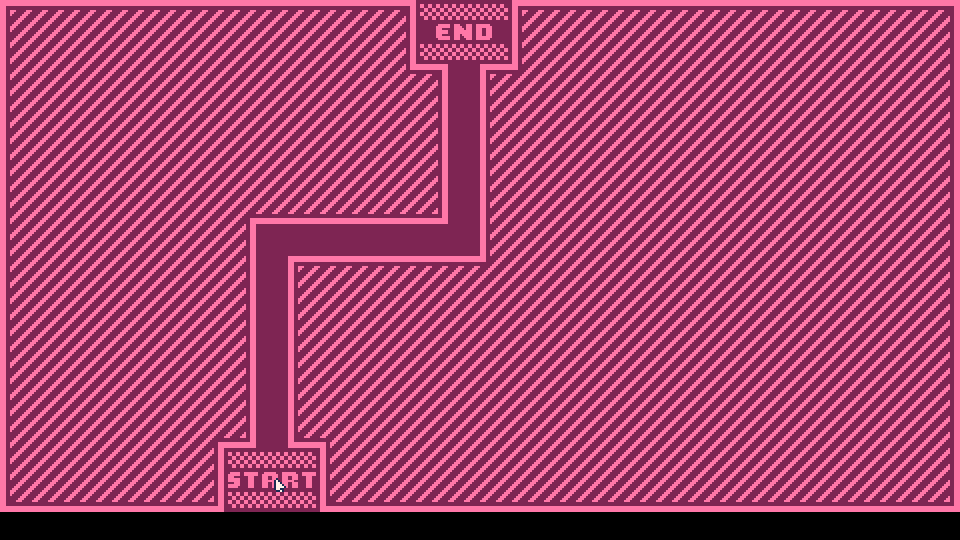
“Bubblegum”

“Desert”

“Lilac”

And that’s it! #
Yep, I’ve decided this is enough of an MVP to count for my Hope Jam goal. I do want to continue this project in the future, as I’ve been brainstorming and taking notes on everything I’d love to add to the game, but for now I need to focus on cleaning the rest of my house! I hope this was a helpful dev log - much love sweet friends!
Shoutout to @toadley for helping me refine and judge palettes!